 P4A Documentation
Submitting a ruleset
Share an API Governance ruleset by submitting a public repository that contains an AMF Validation Profile.
Overview
You share a ruleset by pointing P4A at a public GitHub, GitLab, or Bitbucket repository that contains it. P4A checks the profile and reads its rules, then the submission goes to review. Once it's approved, it appears in the Rulesets catalog. Start from the Submit a ruleset button on the Rulesets page. You can follow your submissions on the Rulesets tab of My Contributions. New to rulesets? Read Rulesets in P4A first.
What the repository needs
The repository must contain an AMF Validation Profile. This is the YAML file MuleSoft API Governance rulesets are written in. Its first non-blank line must be the dialect header #%Validation Profile 1.0. The file also needs:
- a non-empty
profilename - at least one rule listed under
violation,warning, orinfo - a
validationsmap that defines every rule you listed
#%Validation Profile 1.0
profile: API basics
description: Minimum documentation rules for REST APIs.
violation:
  - api-has-title
warning:
  - operations-have-descriptions
validations:
  api-has-title:
    message: The API must have a title.
    targetClass: apiContract.WebAPI
    propertyConstraints:
      core.name:
        minCount: 1
  operations-have-descriptions:
    message: Every operation should have a description.
    targetClass: apiContract.Operation
    propertyConstraints:
      core.description:
        minCount: 1
The profile can be at most 512 KB. An exchange.json next to it is optional. When it's there, P4A uses its description and assetId to prefill the wizard.
How P4A finds the profile
P4A looks for the profile in the ruleset root. That's the repository root, or a folder if your URL points at one (for example …/tree/main/rulesets/api-basics). It takes the first match from this list:
- The Ruleset file you enter in the wizard.
- The
mainfield ofexchange.json. - A file named
ruleset.yaml. - The only
.yamlor.ymlfile in the root that starts with the dialect header.
If the root holds more than one profile, fill in Ruleset file or set main in exchange.json.
Adding a custom icon
To give your ruleset its own icon in the catalog, add an icon.png or icon.svg to the ruleset root. The ruleset root is the repository root, or the folder your repository URL points at. If both files are there, P4A uses icon.png. A square image of at least 64 × 64 pixels looks best.
P4A doesn't look for the icon next to a Ruleset file in a subfolder. If your profile is at profiles/agent-rules.yaml, put the icon at the ruleset root, not in profiles/.
The Validate step shows the icon it found, or says that the default icon will be used. P4A reads the icon from the branch, tag, or commit you validate, and saves it with your submission. Without an icon, the ruleset shows the default ruleset icon.
The icon is read when you submit, and again when you change the repository, branch, or ruleset file of a submission. If you move a submission to another repository or branch that has no icon, the old icon is removed. Adding an icon to the repository later doesn't update a ruleset that's already in the catalog, so ask an admin to refresh it.
To use an image hosted somewhere else, enter its address in Icon URL override on the wizard's Links & media step. It takes the place of the repository icon. To show the default ruleset icon even though your repository has one, select Don't show a custom icon (use the default). The step previews the icon your ruleset will get.
The submission wizard
- Basics: the Ruleset name shown in the catalog.
- Repository: the repository URL, an optional Branch, tag, or commit, and an optional Ruleset file.
- Validate: P4A checks the repository and shows each check as passed, failed, or not checked. The next step stays locked until every check passes.
- Details: Description, Category, Exchange asset ID, and the Target APIs the ruleset applies to.
- Pick the Category from the list: Security, API Design, Documentation, Compliance, MCP, A2A, LLM, Operations, or Other. Choose Other if none fits. A reviewer can change it.
- The Target APIs are the API types Anypoint API Governance applies rulesets to: REST APIs, AsyncAPI, HTTP APIs, gRPC APIs, Agents, and MCP servers. P4A suggests them from the profile's rules, and you can change them.
- Documentation (optional): write the ruleset's Rules, Examples, and FAQ tabs, or add your own tabs. See Documenting your ruleset.
- Links & media (optional): a Video tutorial URL, an Examples URL, and the ruleset's icon. See Adding a custom icon.
- Review: a summary, including the detected profile name, rule counts, links, icon, and how many documentation tabs you filled. Click Submit for review to send it.
Once every required step passes, a Skip to review button lets you jump past the optional steps to Review.
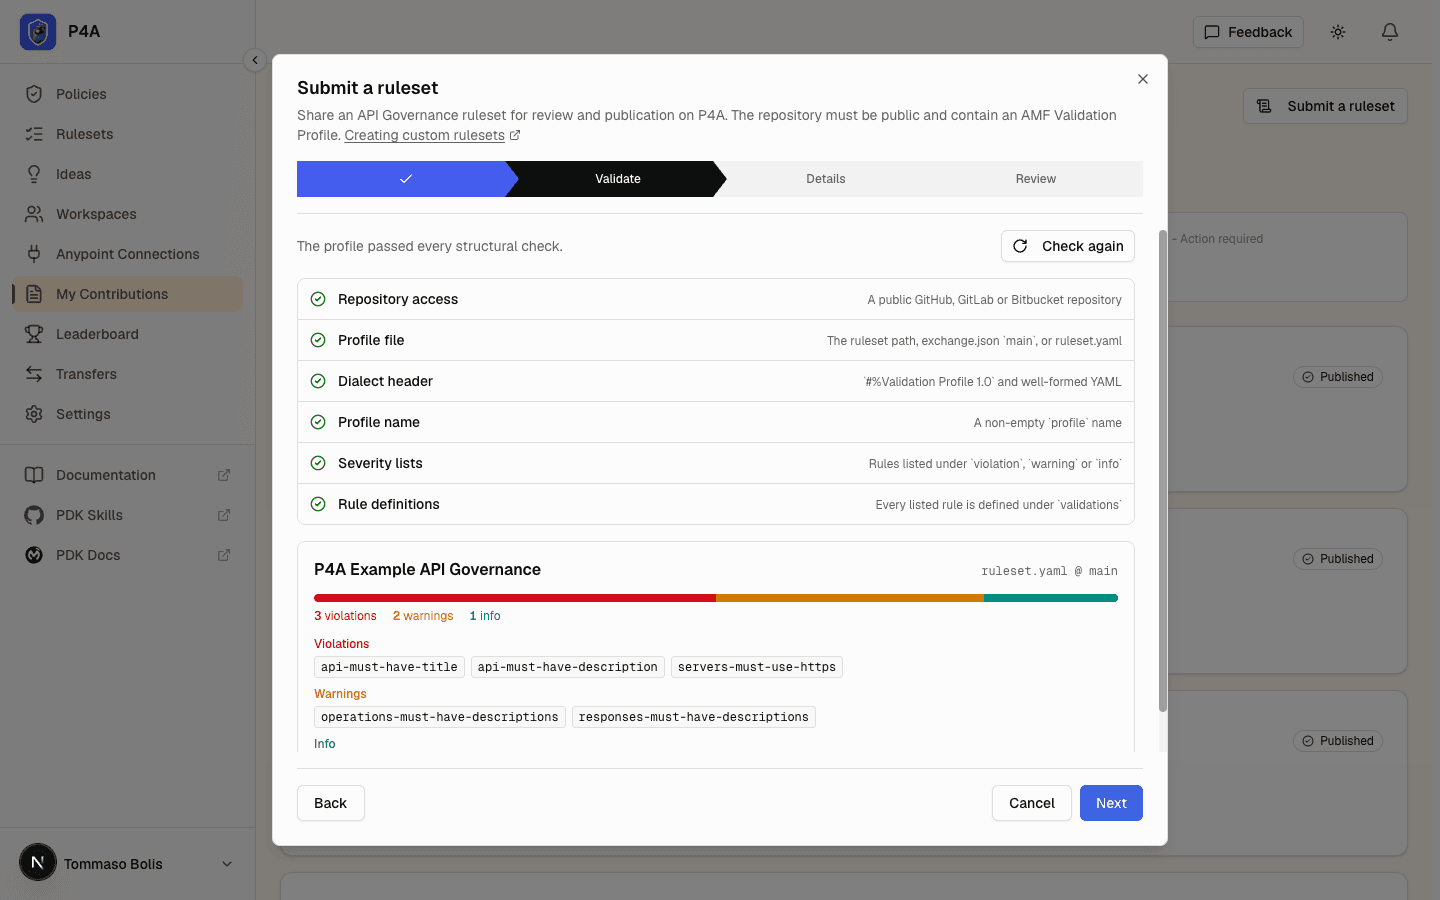
Choosing a default branch
Leave Branch, tag, or commit blank to use the repository's default branch, or pick a branch from the suggestions. P4A validates that ref, and the ruleset's View YAML link points at it.
Fixing validation errors
Each failed check names the problem and, when it can, the line number:
| Check | Typical error | Fix |
|---|---|---|
| Repository access | Repository not found or not public | Make the repository public, and check the URL. |
| Profile file | No Validation Profile found, or more than one | Add a ruleset.yaml, set main in exchange.json, or fill in Ruleset file. |
| Dialect header | Line 1 must be #%Validation Profile 1.0, or the file isn't valid YAML | Put the header on the first line and fix the YAML at the line shown. |
| Profile name | No profile name | Add profile: <name>. |
| Severity lists | No rules under violation, warning, or info | List at least one rule name under a severity. |
| Rule definitions | A listed rule isn't defined under validations | Define the rule, or remove it from the list. |
P4A checks the profile's structure. It doesn't run your rules against an API. Test them locally before you submit; see Validating and Publishing Custom Rulesets.
After you submit
Your submission moves through the same states as a policy: Submitted, Under Review, then Published, Needs Improvement, or Rejected. While it's under review, you're one of its reviewers with the commenter role: you can open its catalog page, reply to reviewer comments in its Discussion, and publish it to your own Anypoint organization to try it out. Other people may be invited to review it too. If it's sent back for improvements, those invitations end, and you're added back as a commenter when it returns to review. You're notified whenever a decision is made.
Resubmitting after feedback
If a reviewer asks for improvements, open the submission from the Rulesets tab of My Contributions to read the feedback, then click Resubmit for Review. The Update & resubmit wizard opens with your earlier answers. Fix the repository if needed, re-run validation, update the details and the documentation, and click Resubmit for review. The submission goes back to Submitted. Reviewers see it marked as revised, with your changes shown next to the version they last reviewed.
Documenting your ruleset
Every ruleset has a documentation page with four tabs: Overview, Rules, Examples, and FAQ. Use Rules to explain what the ruleset checks and why. You can add your own tabs too, such as "Limitations" or "Changelog". If you leave the Overview empty, it starts with your ruleset's description.
- Where to edit. Fill the tabs in the wizard's Documentation step, or later from the Docs button on the ruleset's page.
- Who can edit. You, as the owner, and platform admins. While the ruleset is under review, reviewers with the editor role can edit them as well.
- What readers see. Readers see the Overview and every tab that has content. Empty tabs stay hidden. The documentation is visible to the same people who can see the ruleset.
- Send-backs keep your work. If the ruleset is sent back for improvements, its documentation is kept with your submission. The Update & resubmit wizard opens with it, and it's back on the ruleset's page when the ruleset returns to review.
Agents can read and edit the same tabs through the MCP tools get_ruleset_docs, set_ruleset_doc_tab, and replace_ruleset_docs. See MCP tools.
Editing a published ruleset
Once your ruleset is published, you can propose a new description or a new source without resubmitting it. On the ruleset's page, click Propose edit on the About this ruleset card or the Source repository card.
- Description: edit the Markdown text.
- Source: change the repository URL, the branch, the ruleset file, or any combination. These three are reviewed as one change. P4A validates the new source when you submit, so a repository without a valid profile is rejected straight away.
Your edit doesn't go live right away. The card shows Pending review, and the catalog keeps the current value until an administrator approves it. When a source change is approved, P4A validates the repository again and refreshes the profile name and rules from it. If the repository no longer validates at that point, the edit can't be approved until the repository is fixed. You can have one pending edit per card at a time.
Crediting contributors
A ruleset can credit contributors: other registered P4A users who helped build it. They appear in a Contributors tile next to the owner on the ruleset's page, and each name links to that person's public profile. Crediting is attribution only. A contributor gains no ability to edit, publish, or manage the ruleset.
As the owner, open the Contributors tile on your ruleset's page and use the pencil to open Manage contributors. Search by name or @username and pick people to add, or mark an existing contributor for removal with the ✕ next to their name. Nothing changes until you click Save. You can only credit people who already have a P4A account.
Once the ruleset is published, each contributor earns recognition on the community leaderboard and the ruleset appears in the Contributed rulesets list on their public profile. Credits added while the ruleset is under review are kept if it's sent back for improvements, and return when it goes back to review.
Next steps
Once your ruleset is published in the catalog, publish it to your Exchange to use it in a governance profile. To write the next one faster with your agent, see Authoring a ruleset.