 P4A Documentation
Deploying a policy
Publish an approved policy to your Anypoint organisation through a registered Anypoint connection.
Overview
Once your policy has been approved and you have at least one Anypoint connection registered, P4A can publish the policy to your Anypoint organisation on your behalf. This page covers the deploy flow itself — selecting where to deploy, choosing Publish vs Release, and tracking the result. If you don't have a connection yet, set one up first via Connecting your Anypoint ORG.
Triggering a deployment
You deploy any approved policy from the policy detail page. Click the Deploy action and a dialog opens with everything the build pipeline needs to know.
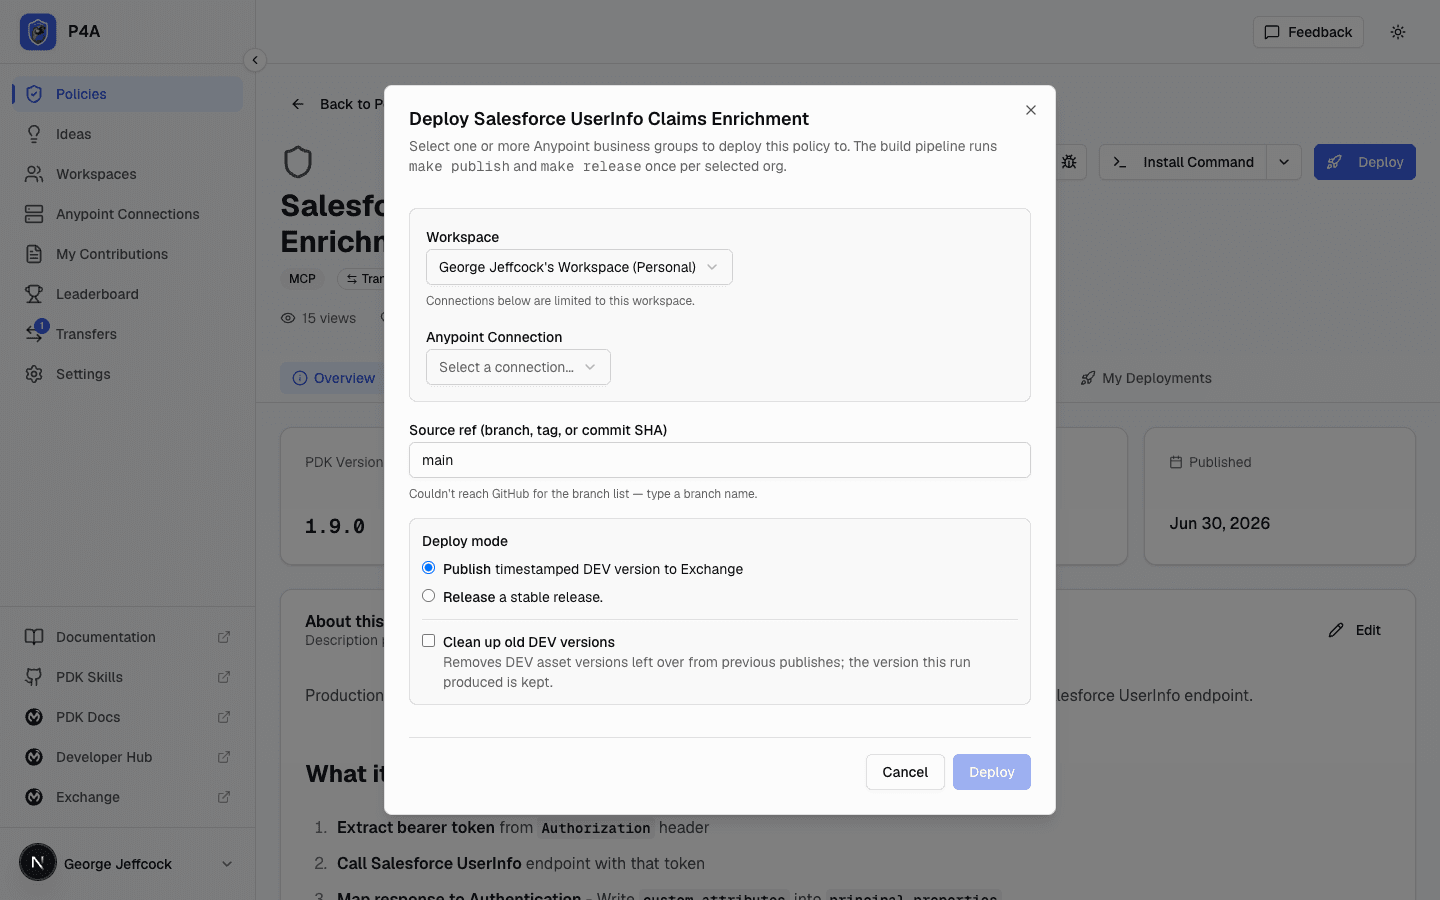
Fields in the Deploy dialog
- Workspace — the workspace whose connections you want to deploy through. Defaults to your personal workspace; switch to a shared workspace to scope the connection picker to that workspace's shared connections. See Using workspaces for who can link a connection into a shared workspace.
- Anypoint Connection — one of the Connected Apps reachable from the selected workspace. The list shows the connection's display name and host region (US, EU, etc.).
- Target business groups — the Anypoint business groups to publish into. Each selected group becomes its own deployment row and its own Exchange asset, all running in parallel. Pick one for a single-org deploy or several to fan out.
- Source ref — the git ref of your policy repository to build from: a branch, a tag, or a full commit SHA. The field is a free-text combobox — start typing and P4A suggests matching branches it pre-loaded from GitHub, but you can type any tag or commit SHA the suggestions don't list (handy for pinning a deploy to an exact commit, or when the repo has more than 100 branches and the list is truncated). The ref is validated against GitHub before the build is enqueued. Defaults to the ref pinned in the policy URL or the repo's default branch.
- Version — optional. Overrides the version label of the Exchange asset this deploy produces. Enter a version like
1.2.3(three dot-separated numbers — novprefix, no pre-release suffix). Leave it blank to use the version declared in your policy repository, which is the usual case. This is handy when you want to publish or release a specific version without editing and pushing a commit to the repo first. A Publish still appends its timestamped-devsuffix to whatever version you set. The Version field only appears for single-policy deploys — a bulk deploy always uses each policy's own repository version. - Deploy mode — see the next section.
- Clean up old DEV versions — optional checkbox. When set, after a successful Publish run P4A removes older DEV asset versions from Exchange and keeps only the version this run produced. Has no effect on Release runs.
Deploy mode: Publish vs Release
Deploy mode is the most consequential field in the dialog, and the two modes are mutually exclusive (radio buttons):
| Publish | Release | |
|---|---|---|
| Exchange asset version label | Timestamped DEV version (e.g. 1.2.0-20260616153000) | Stable release (e.g. 1.2.0) |
| Intended audience | Yourself / your team for testing in a sandbox business group | Consumers across your Anypoint organisation |
| Mutability | Each Publish creates a new DEV version; older DEVs can be cleaned up via the checkbox above | Stable, immutable once released — bump the policy version for the next release |
| When to use | Iterating on the policy, smoke-testing a fix, validating a branch, tag, or specific commit | You're confident the policy is ready for downstream API instances |
In short: Publish is for "let me try this out", Release is for "this is the version I want my consumers to apply." A policy can have many Publishes and few Releases. The build pipeline runs make publish for the Publish mode and make release for the Release mode, once per selected business group.
When you click Deploy, P4A enqueues one build job per selected business group. Each job clones your repository at the chosen ref, runs the corresponding make target, and publishes the resulting Exchange asset to that business group. Once expanded, each run in a deployment's history shows the git ref it built from next to its timestamp. You can monitor progress per row from My Deployments below.
Deployments can occasionally be paused platform-wide for a short maintenance window. If so, the Deploy dialog shows a banner explaining that new deployments aren't accepted right now and the Deploy button is disabled — nothing is lost, and any deployment already in flight keeps running to completion. This clears automatically; just try again shortly.
Deploying several policies at once
When you need to roll the same policies out to the same set of business groups, you don't have to open each policy's detail page in turn. From the policies catalog list, click Select to enter multi-select mode, then click the policy cards you want — each shows a checkbox and a highlighted border when selected. A bar appears at the bottom summarising how many are selected, with two ways to back out:
- Clear selection — unselect every card but stay in select mode, so you can start a fresh selection.
- Cancel — leave select mode entirely and return the list to normal navigation.
Click Deploy in that bar to open the same Deploy dialog described above, this time applied to every selected policy. The workspace, connection, target business groups, deploy mode, cleanup option, and source ref you choose apply to all the selected policies — there are no per-policy overrides, and the single-policy Version override is not offered for a bulk deploy (each policy uses its own repository version). Because the selected policies may live in different repositories, the source ref is a plain text field (branch, tag, or commit SHA) rather than a branch-suggesting combobox; the same ref is validated against each policy's repository when its build is enqueued.
Deploying N policies to M business groups queues N × M deployments. If some succeed and others fail, the dialog reports each outcome individually so you can see exactly which policy-and-group combinations were queued and which need attention, and the successful ones stay queued regardless.
Watching a deployment run
While a deployment is in flight, the corresponding row in My Deployments shows a pending (or in-progress) status and exposes a live build-log stream — useful for catching PDK build failures or Anypoint Exchange publish errors without leaving the portal. Expand the row to see the log output update in real time as the worker progresses through clone → build → publish. The expanded log panel has two buttons in its top-right corner: Copy puts the full log text on your clipboard, and Download saves it to a local .log file — handy for attaching to a bug report or keeping a record after the deployment is removed.
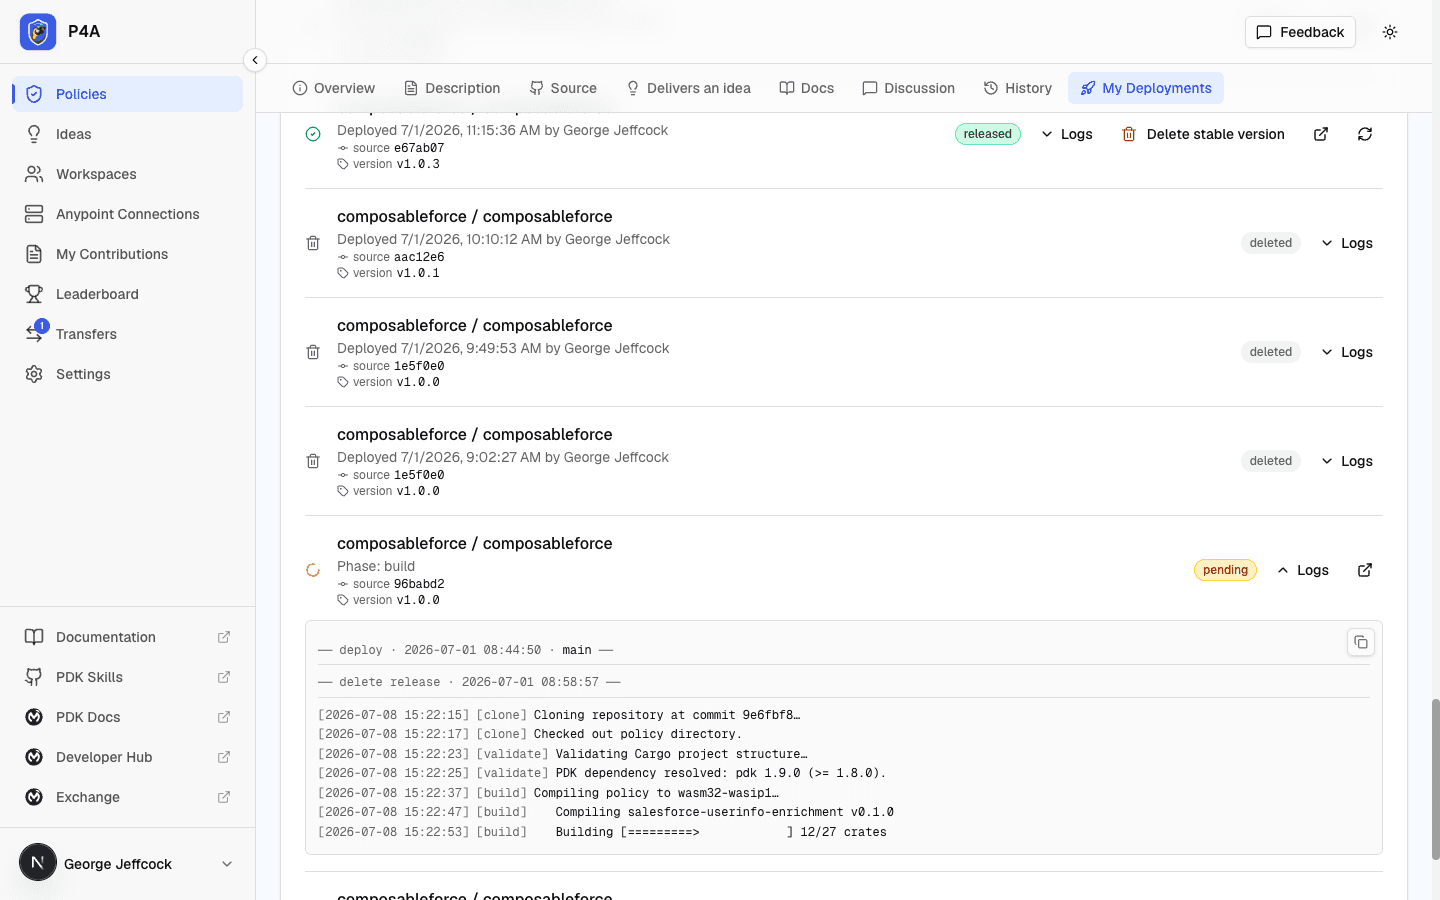
A policy config property must not be named after a Rust reserved word (for example type, match, fn, mod, impl, struct, move, ref, use, loop, or where). If one is, the build fails and the log names the offending property — rename it (for example type → fieldType) in your policy's gcl.yaml and re-deploy.
Documentation page on the Exchange asset
When a deploy succeeds, P4A also publishes a documentation page to the resulting Exchange asset, so the listing carries a real description — the policy's name, summary, and links back to its source and P4A portal page — instead of an empty page. This happens automatically; there's nothing extra to enable.
Publishing the documentation page is best-effort and never blocks the deploy: if the page fails to publish, the asset is still deployed and usable. When that happens, the deployment row shows a small docs page not published note. It means the Exchange listing has no description page even though the deploy itself succeeded — re-deploy to try publishing it again.
Deployment history
The policy detail page lists all past deployment attempts under My Deployments. Each entry shows the target connection and business group, the deployment timestamp, and a status (released, published, pending, failed, deleted). Entries also show the published Exchange asset version they shipped — a single version label (e.g. v1.2.0) for a standard policy, or separate definition and implementation versions (e.g. def v1.2.0 · impl v1.0.0) when the policy publishes its definition and implementation as separate assets. You can filter the list by status, expand any entry to see the build logs that ran for it, jump to the deployed asset on Exchange, or trigger a re-deploy.
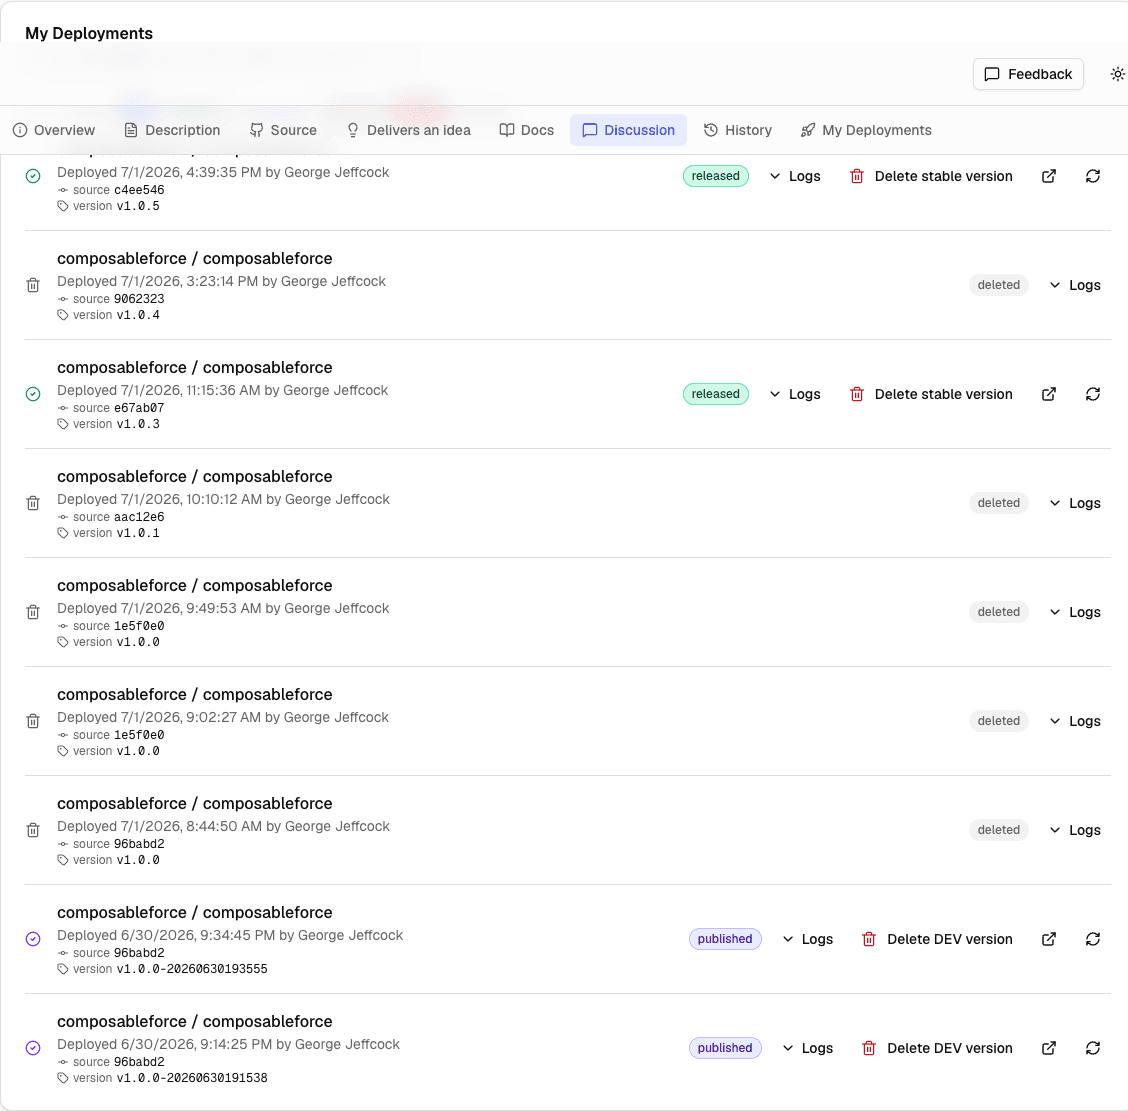
Keeping deployments in step with Exchange
Assets can be removed from Anypoint Exchange outside of P4A — someone deletes them by hand, an org gets cleaned up, or a version expires. When that happens, a deployment that P4A still shows as published or released no longer has a live asset behind it. P4A never changes a deployment's status on its own; you reconcile it when you're ready.
There are two ways to bring things back in step:
- One deployment — expand a
publishedorreleasedentry in My Deployments and choose Sync. P4A checks whether the entry's asset still exists on Exchange. If it's gone, the entry is markeddeleted; if it's still there (or the check can't be completed), nothing changes. - A whole connection — on the Anypoint Connections page, click Sync on a connection card. P4A re-checks the connection's credentials and then probes every live deployment running through it. If any appear to be gone from Exchange, a dialog lists them and lets you tick which ones to mark
deleted. Nothing is changed until you confirm — deployments that are still present, or that couldn't be verified, are left alone.

Marking a deployment deleted only updates its status in P4A — it does not touch anything on Anypoint. It's a record that the asset is no longer live, and the entry stays in your history.
Cleaning up failed deployments
A deployment that errors out leaves a failed entry in My Deployments. Once you no longer need its build logs, you can remove it permanently:
- One at a time — expand a
failedentry and choose Delete to remove that single row and its build logs. - All at once — use Delete all failed in the My Deployments header to clear every failed entry you own for the policy in one step.
Both actions ask you to confirm first, and only ever touch your own failed rows — released, published, and pending deployments cannot be deleted this way (cancel or unpublish those instead). Deletion is permanent: the deployment row and its build logs are removed and do not appear in history afterward.